Originally, this recipe was supposed to appear in a May/June vegan publication, but that never came to fruition; they ran out of room in their international cuisine issue. Ah, well. I spent time perfecting it, so it seems only right that I share it with you all!
Before you attempt this recipe, though, consult my troubleshooting tips. I gained lots of wisdom that may help you in your macaron-making journey. Also, consult my first recipe for a helpful supply list.

I really like playing around with floral flavors, but the best piece of advice I can give you about it is -- less is more! Really! You only need three drops of lavender oil in this recipe, otherwise they start to taste like soap. The oils are so highly concentrated that a little goes a long way. Check food specialty stores for food grade lavender oil or you can order Lavender Vitality from Young Living. It's been about a year since I fully jumped on the essential oil bandwagon and I'm so happy that I did!
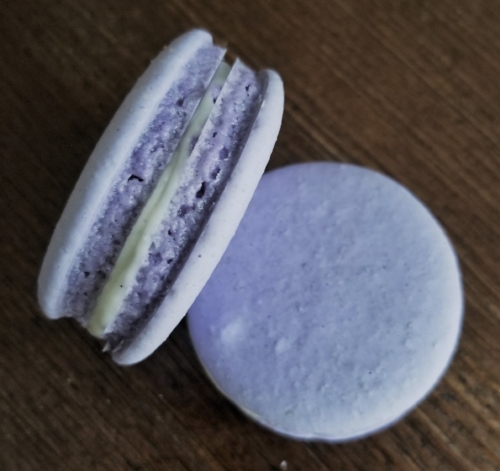
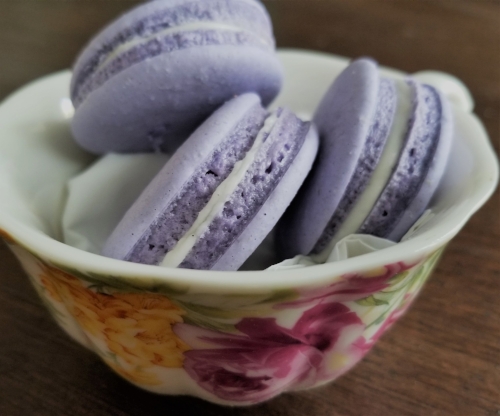
Vegan Lavender & Vanilla Bean French Macarons
liquid from one 15 oz can of chickpeas; about 3/4 cup
1/2 c. organic sugar (vegan)
1 c. almond flour, like Bob's Red Mill
1/2 c. vegan powdered sugar
3 drops of food grade lavender oil
1/4 tsp. cream of tartar
gel or powder food color (optional)
Directions
In a small saucepan, bring your chickpea liquid to a boil. When it boils, lower the heat and allow it to simmer/reduce for 10 solid minutes - set a timer! This boiling liquid will smell weird, FYI. You want it to reduce to about 1/3 cup. Cool this mixture for 10 minutes, minimally.
While that's reducing, combine the almond flour and powdered sugar in the food processor. Pulse to combine and run it for a minute or two.
Transfer the powdery mix to the sifter and sift. Some macaron recipes I've used say to sift three times. I only sifted this recipe once. Discard any large chunks that won't go through the sifter.
Measure out your regular sugar. Set it aside.
Once your chickpea liquid has cooled, pour it into your stand mixer bowl along with the Cream of Tartar and attach your whisk. Turn the mixer on to a medium-high setting (about a 5-6 setting) and whisk for 2 solid minutes - set a timer! The mixture should get frothy and foamy.
Add your regular sugar. Beat the mixture on high for 5 minutes - again, set a timer! This is the stage where the true magic happens. It's amazing to watch! When you're finished, the mixture should look like a meringue with stiff, glossy peaks. After, add your drops of lavender and food coloring and beat on high for 1 more minute. (I used about 20 drops of purple gel food coloring. Don't use regular liquid food coloring because it will water the batter down.)
When your meringue is done, fold in the sifted mixture in thirds. (Pour one-third in and fold. Repeat.) You want it to be a thick, firm batter; but you also want it to be a little shiny. Someone likened it to lava flowing slowly down a mountain, but I'm not sure what sense that makes. This is the stage that you just have to get the knack for. This is why macaron-making is challenging! You'll need to fold the batter at least 40-60 times; if your arm doesn't hurt, you're not doing it right. Consult my troubleshooting page.
Load the batter into your piping bag with a spatula. Snip a hole, about a half-inch from the end of the bag. If hold the bag upright at a 90 degree angle, the batter should drip out slowly, most likely in small blobs. If it's runny, you have a problem. If it's stiff and not moving without help, you have a different problem! This takes finesse.
Pipe cookies the size of a quarter/half dollar onto your Silpat mats. Repeat piping the batter until you run out of batter - or room.

When you're done piping, smack the cookie sheets on the counter a few times. You want to get the macarons to smooth out and release any air bubbles inside. Whack them - don't be afraid to hurt them. My macarons started with small peaks but once I smacked them a few times, the tops became smoother. That's how you know the batter is good.
Allow the macarons to dry on the counter for 2-3 hours. For real. They should be dry to the lightest touch - don't poke them, haha.
As the drying time winds down, preheat the oven to 205° F.
Bake the macarons for 30 minutes. When the 30 minutes have elapsed, turn the oven off and let the cookies sit in the closed oven for 20 minutes. After those 15 minutes have elapsed, open the oven door and let them cool for another 15 minutes before removing them from the oven.
Voila! Now you have beautiful macarons. Hopefully ;-)
Be sure to try my other flavors as well: Earl Grey with Lemon Buttercream and Raspberry & Elderflower Macarons and Biscoff & Bourbon Macarons.
For the icing:
2 T. organic non-hydrogenated shortening, or vegan butter
2 tsp. vanilla bean paste (or you can scrape the innards of two vanilla beans)
2 c. vegan powdered sugar
a few T. almond milk, as needed
Combine the ingredients in a medium-sized bowl and use a spatula to combine. If you need a little more liquid to get the icing together, add a little almond milk to the mix, about a tablespoon at a time.
Using another piping bag, gently pipe the icing onto one side of a macaron. Grab another macaron and sandwich them together. (I like to call it the reverse Oreo method. You know, when you were a kid and you "unscrewed" the Oreo cookies? Well, twist the macarons to make them go together!) If you have some leftover, save it in the freezer for another use!
Put the macarons into the fridge (an air-tight container) and let the flavors marry overnight -- they taste so much better the next day! Store in the fridge, but let them warm to room temperature before eating them.
I hope you enjoy these macarons and get to know the process a little better!
Cheers!
-Aileen